
To enter or amend your template and folder location settings click on the cogwheel in the top right corner to view System Settings.
SILQ can automatically save and track a document each time you generate one. It also has the ability to create a folder structure for you to save your documents into.
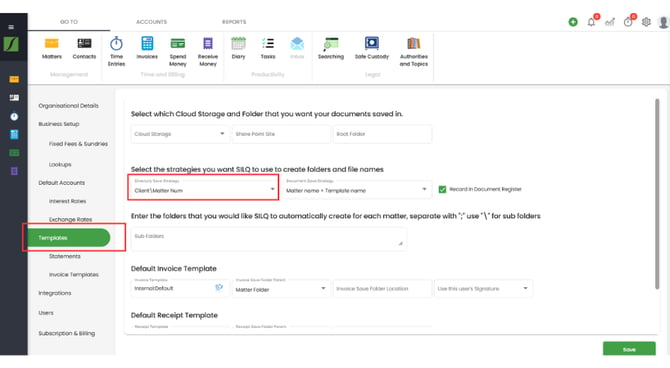
Select the Templates option on the left.
Document System
When SILQ saves the file, it needs to know what folder to save it in and how to name the folder. Choose an option from the Directory Save Strategy drop down menu. There are a number of options that are combinations made up from the items below:
Client: This will create a folder using the client's name.
Matter Num: This will create a folder using the matter short name.
Matter Desc: This will create a folder using the Matter Desc.
First Letter: This will create a folder using the first letter of the matter Matter Num. "Matters": This will create a folder called "Matters"
Year: This will create a folder using the year
Client ID: This will create a folder using the client ID
First Name: This will create a folder using the client’s first name
Matter Num: This will use the name of the matter number
Example: Client\Matter Num: This will create a folder for the client in the Invoices folder, as that is the name of the root folder, it will then create a sub folder for the matter using its Matter Num. E.g. Invoices\McCaffrey Garling Conn\JOHN0001
Sub Folders
When you set up a matter for a new client, SILQ will automatically create a client folder for you on your document system, so any document you generate out of SILQ get saved to this folder.
The way SILQ sets up your folder structure depends on the folder naming strategy you choose.
As an example, if you chose the folder naming strategy; Client/Matter Num, and the client was ANZ and the matter number was ANZ001, SILQ will create a client folder called ANZ and then a folder inside this main folder called ANZ0001. All documents that are then generated out of SILQ for this matter will be saved in the ANZ0001 folder.
With sub folders, you can create your own customised folder structure inside the Matter Number folder. In our example that would be sub folders inside the ANZ0001 folder. So you could create an Accounts folder and a Correspondence folder inside the main Matter Number folder (ANZ0001).
To create sub folders, click into the Sub Folders dialogue box in the Settings window under Template Settings, and type in the names of the folders you want to create separating them with “;”. If you want to create sub folders within a folder you need to use “\”.
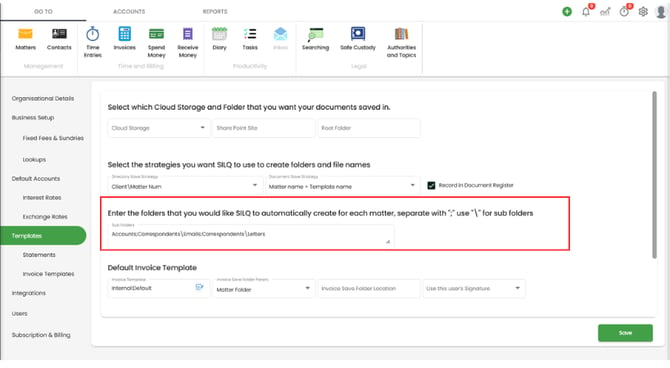
Refer to the screenshot above.
For example, typing the following into the Sub Folders dialogue box:
Accounts;Correspondents\Emails;Correspondents\Letters
will create a folder called Accounts and a folder called Correspondents as well two sub folders inside the Correspondents folder, Emails and Letters.
From now on based on the example above, whenever SILQ creates a new Client folder or a new matter folder in an existing client folder, this is what the folder structure will look like.
SILQ will propose a file name for the document based on the strategy you click. Choose an option from the Document Save Strategy Drop Down menu.
There are a number of options that are made up by 3 items:
Matter Desc: This will use the name of the matter in the document name.
Template name: This will use the template name.
Date: This will use the date the document generated
Example 1: Matter Name + Template Name + Date will generate a document name with the name of the matter, then the name of the template used and then the date it was generated. E.g. Johnson - Fee Agreement - 25 NOV 2014.doc
Example 2: Date + Matter Name + Template Name will generate a document name with the date of the matter, then the matter number, and then the name of the template used. E.g. 2014-11-25 - PARK0001 - Letterhead.docx