The Settlement Calculator helps you determine the final property settlement amount for a conveyancing matter by allowing you to enter all relevant financial details prior to settlement.
The layout supports inputs, including:
-
adjustment or statement items
-
amounts required to settle
-
payment directions
-
available funds and balances
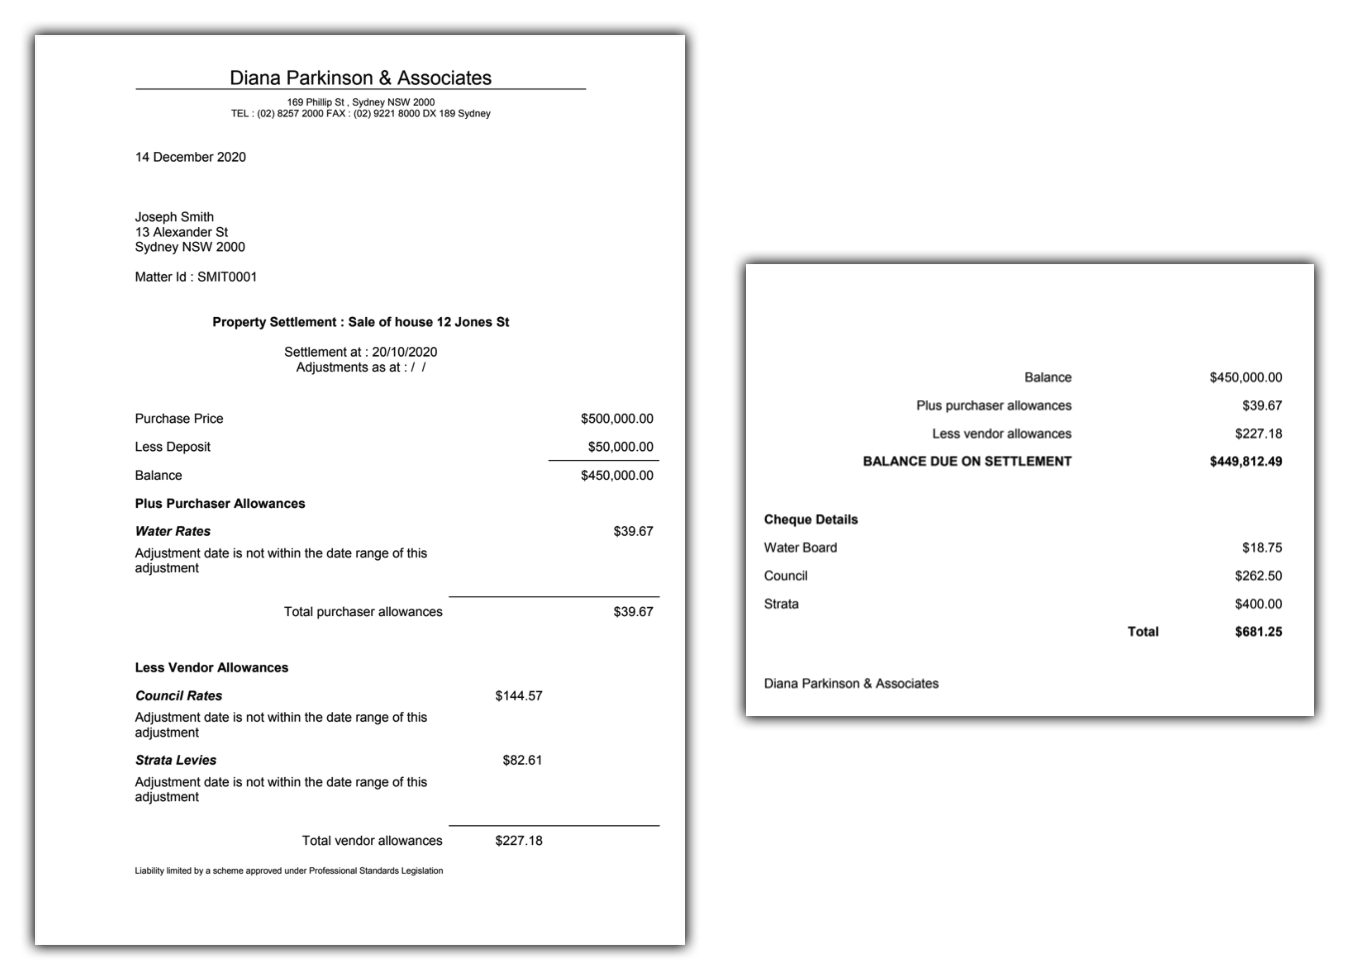
All data entered here is used to automatically populate conveyancing based templates such as the Settlement Adjustment Sheet, Settlement Statement, and Reconciliation Statement.
The Settlement calculator information visible on the left hand-side is based on acting on behalf of the vendor.
To access the settlement calculator:
- When creating a matter that you need to use the settlement calculator for, make sure to choose one of the below matter classes as the settlement calculator icon will be greyed out for any of the other matter classes:
- Business Purchase
- Business Sale
- Property Purchase
- Property Sale
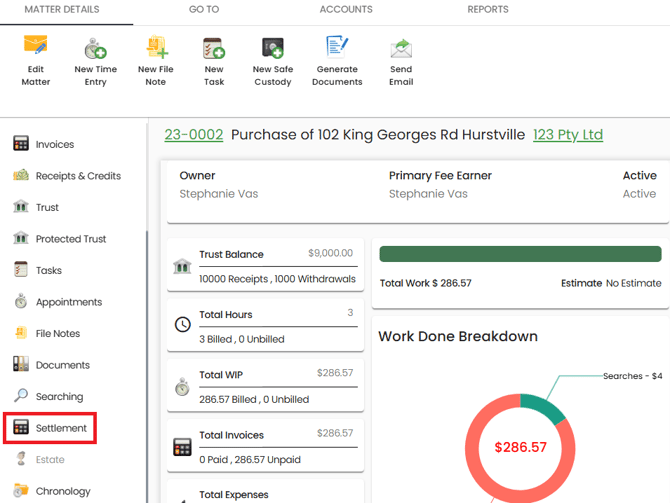
- From the matters window, highlight the matter, and click on the matter details icon in the top ribbon.
- From the left hand matter navigation, click on the settlement icon
Once you are in the settlement calculator window:
Understanding the calculator
- In the left hand calculator column, if you haven’t already entered the address of the property when you set up the matter, click on the Address button, which will open up the Matter Address window and allow you to enter the address details. Once these details are entered click on the Close button. You will see the calculator populate with the address and it will automatically update the matter.
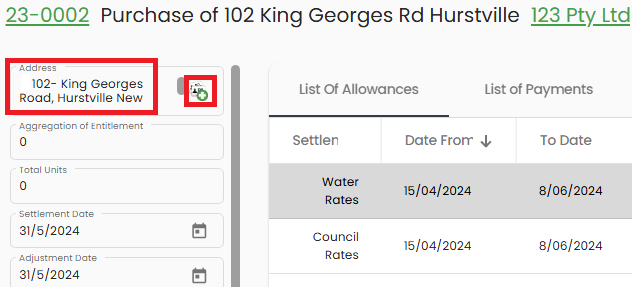
- If the property is a unit and body corporate expenses are to be divided amongst lot owners, then you can enter the total number of units (Lots) into the Total Units field and then depending on the Total Units, enter the corresponding Aggregate Entitlement for the property into the Aggregation of Entitlement field.
- Next enter the details in the below fields:
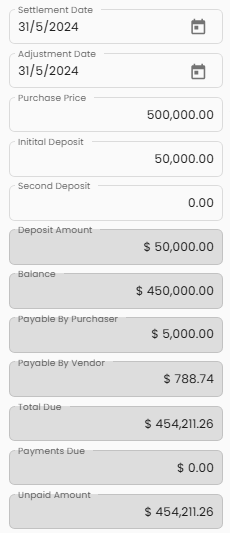
- Settlement Date - The agreed date on which the property ownership officially transfers from seller to buyer. It also determines when final payments and adjustments must be completed.
- Adjustment Date - used to determine how financial adjustments (such as council rates, water, or strata levies) are calculated between the buyer and seller.
It sets the cut-off date for pro-rata calculations — ensuring charges are fairly divided based on who is responsible for the property up to that date. Typically, this is the settlement date, but it can vary depending on contract terms.
- Purchase Price - The total agreed purchase price for the property as stated in the contract.
- Initial Deposit - The first deposit amount paid by the purchaser, typically at the time of contract exchange.
- Second Deposit - Any additional deposit amount paid after the initial deposit but prior to settlement. This field can be left blank if not applicable.
Non - Editable Fields
These values are automatically calculated by SILQ based on the data entered above and any allowances applied within the settlement calculator:
- Deposit Amount - The total of the Initial Deposit and Second Deposit combined.
- Balance - The remaining amount payable after deposits have been deducted from the Purchase Price. (Purchase Price – Deposit Amount)
- Payable by Purchaser - The total amount the purchaser must pay at settlement, factoring in the balance, adjustments, and any purchaser-specific allowances.
- Payable by Vendor - The total amount to be deducted from the vendor’s proceeds at settlement, including vendor allowances such as unpaid rates or disbursements.
- Total Due - This is the amount due from the purchaser to the vendor. The calculation is Balance Due plus Payable by Purchaser minus Payable by Vendor.
- Payments Due - A summarised total of all payment directions specified in the payments section (i.e. where funds are to be distributed at settlement).
The Total Due fields and the Payments Due should tally. - Unpaid Amount - This value will start to reduce as you add payments. It should ultimately be $0, confirming that the payment directions fully account for the total due. If it is not $0, it indicates a shortfall or overpayment.
Entering Allowances
The next step is to start adding allowances, which will allow you to calculate the final settlement amount.
To do this:
- Click on the New Allowance button on the Top Toolbar.
- The New Allowance window will open up.
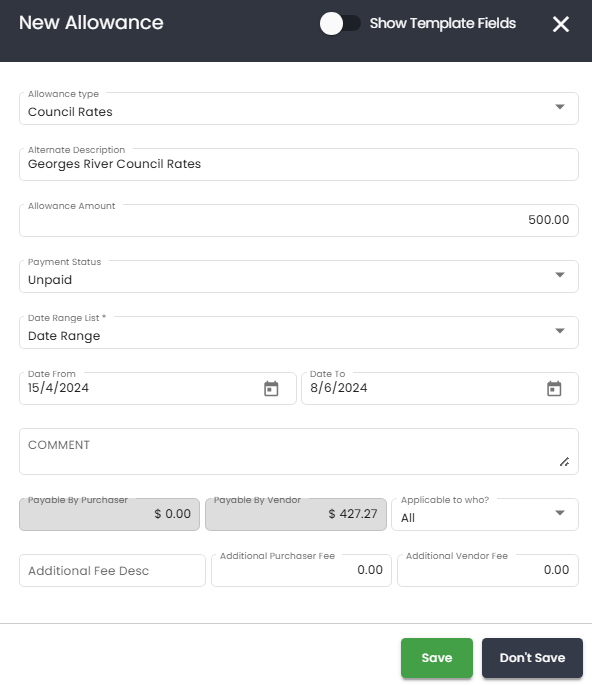
- Fill in the relevant fields (Depending on the allowance type, the fields you need to fill in will change):
- Allowance Type - This will give you a list of all of the pre-configured allowance types such as Council Rates, Water Rates, Pexa Fee etc. You can choose other if we do not have one of the ones you need, however if we do have it, it should be used instead of other.
- Alternative Description - allows you to customise how an allowance appears in your documents — for example, replacing 'Council Rates' with 'Georges River Council Rates'.
- Allowance Amount - This is the $ amount of the allowance and should be entered exactly as it is on the invoice e.g. the council rates invoice.
- Number of Allowances - This saves you from having to put in identical allowances multiple times. Simply type in how many of the same allowance are relevant and SILQ will duplicate it for you.
- Payment Status - You can choose whether this is paid or unpaid.
- Who Pays? - Choose between Vendor or Purchaser. This will only show up for certain allowances such as discharge of mortgage.
- Balance - This will only show if the Interest Delay option is chosen. This will be the balance on which the interest in point h below is calculated.
- Interest % p.a. - This is the annual interest rate applied to the balance nominated in point g which will only become visible if the Interest Delay option is selected. Remember to put in the annual rate and then SILQ will calculate the actual $ amount of interest applicable to the allowance.
- Water Price ($/KL) - This will only show up when the Water Usage - Daily Usage option is selected. This amount is found on the water rates and is used as an alternative to the standard calculation based on the amount and date.
- Water Usage KL - This will only show up when the Water Usage - Daily Usage option is selected. This amount is found on the water rates and is used as an alternative to the standard calculation based on the amount and date.
- Date Range List - You can choose from any of the following:
- Choose a specific date range by selecting a from and to date.
- From the dropdown you can choose pre-defined date ranges such as Current Financial Year or Last Month.
- Comment - This is an internal note. It will only be visible in SILQ and the client will not see it.
- Payable by Purchaser - this field is not editable. It will be automatically populated based on the information entered into points a to e.
- Payable by Vendor - this field is not editable. It will be automatically populated based on the information entered into points a to e.
- Applicable to Who? - You can decide whether it is applicable to all parties or you can make it applicable to either the purchaser or vendor.
- Additional Fee Description - allows you to include extra fees within an existing allowance — for example, where council rates have been paid but outstanding interest or charges remain. This keeps all related adjustments grouped together rather than creating a separate allowance.
- Additional Purchaser Fee - the $ fee explained in point J. Put it in this field if it is for the purchaser.
- Additional Vendor Fee - the $ fee explained in point J. Put it in this field if it is for the vendor.
- Click on the Save button.
- Repeat this process to add in all the allowances prior to settlement.
Editing an Allowance
- To edit an allowance, highlight the relevant allowance and click on the Edit Allowance button in the ribbon.
- Edit and save the entry.
- Once saved, you will then need to click on the Recalc Amounts button in the ribbon to update the figures.
Deleting an Allowance
- To delete an allowance, highlight the relevant allowance and click on the Delete Allowance button in the ribbon.
- Edit and save the entry.
- Once saved, you will then need to click on the Recalc Amounts button in the ribbon to update the figures.
Entering Payments
The Payments tab in the settlement calculator is where you record and manage outgoing payments related to the settlement. This could include payments made via Pexa, EFT, BPAY, or other authorised payment methods.
Each payment entry is recorded individually and contributes to the Payments Due field listed in the calculator on the left hand side. This ensures all funds are accounted for and properly directed.
To do this:
- Click New Payment
-
Enter the Payee - The name of the person or entity receiving the payment.
-
Enter the Amount - The dollar value to be paid. SILQ will use this add to the Payments Due field and reduce the unpaid amount field.
-
Enter the Payment Date- The date the payment is scheduled or expected to be made. Clicking the calendar icon allows you to select the date.
-
Enter the Payment Type - A dropdown field to select the method of payment — e.g. Pexa, BPAY, EFT, etc. The remaining fields will adapt to whatever payment method is chosen to allow you to input bank details, biller codes, references etc.
Generating Settlement Documents
After all allowance details have been entered, you can click on the Generate Documents button in the ribbon and generate, for example, the Settlement Statement template which will list all the details of the property settlement as well as adjustments & payments in alphabetical order and within their grouping such as Purchaser Allowances or Vendor Allowances.