

To set up additional users / fee earners, click on the settings icon in the top right corner of the SILQ window and a new window will appear. On the right hand side, click on Users.
This will show you the list of users for the data file.
To set up additional users, click the Add button on the top right hand side of the screen.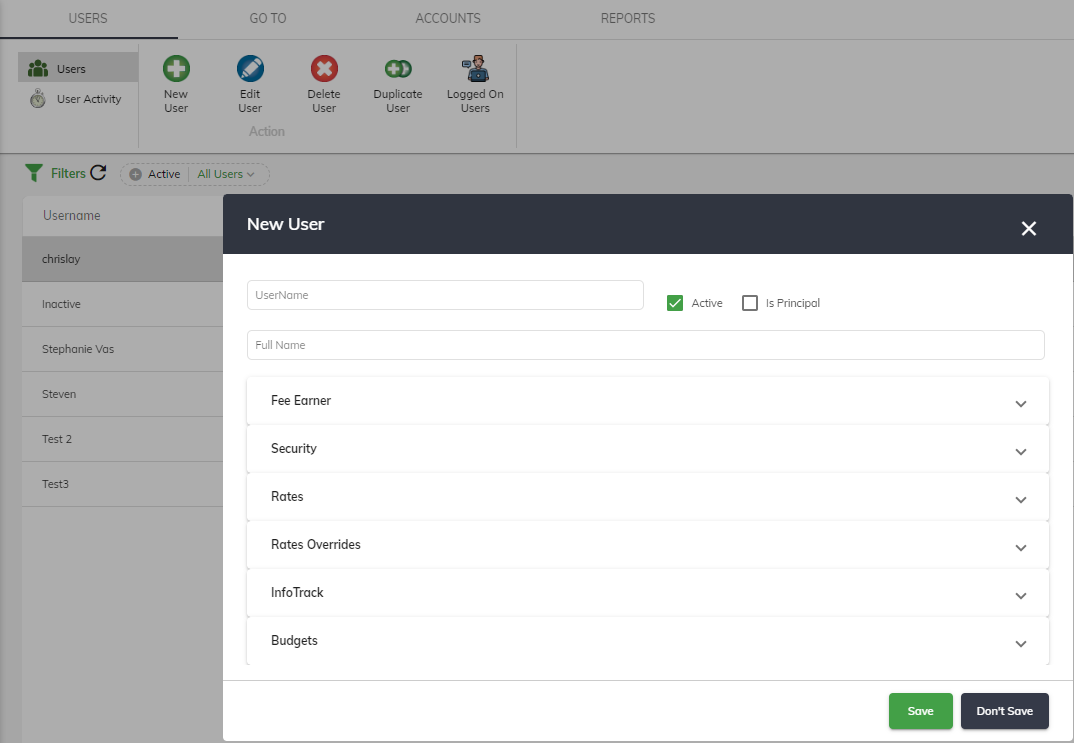
The New User dialogue will open up which will allow you to enter the details of the new user.
For the new user to be able to login to SILQ, the Username, Full Name, Fee Earner ID and Email must be filled out. All other information is is not mandatory.
User Password
We are very focused on security at SILQ and as such to ensure only the user knows their password, once the above is saved, the user themselves need to go to online.Silq.com.au, and click on forgot password which will prompt them to set up a password for themselves. They will need to put in their email address (ensure it is identical to what has been entered at user setup) and they will then be sent an email to confirm it is them. The link in the email will take them to an area to save a new password.
MFA (Multi Factory Authentication)
To ensure even greater security, the user will be able to set up MFA. More information on how to do this can be found here.
Security (User Permissions)
SILQ gives you complete control over what areas of the system the user has access to. This is an essential feature if you wish to restrict access or editing permissions to certain parts of your data. For example, if you want someone to be able to create invoices but not run account reports then you can restrict access. If you want to restrict access to forbid another user from deleting invoices, you can do that. The permissions are very specific and cover off all scenarios firms large and small have brought to our knowledge to date.
To edit user permissions, click on the Security tab to expand it. You will then see a number of other sub tabs relating to specific areas of the system. Each one can be expanded to give or restrict the user access to that area.
Green ticks grant the user access to that part of the system, whilst if it is unticked, access is restricted.
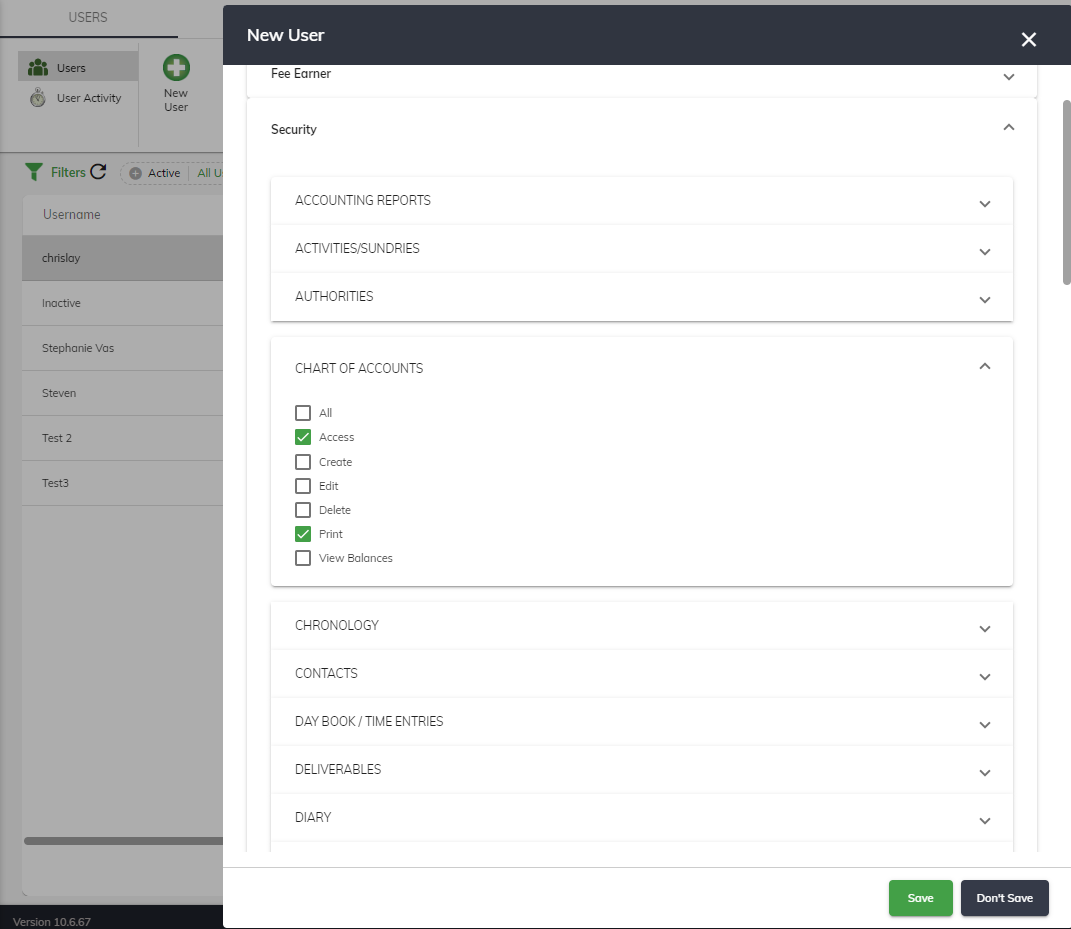
In the example above, if you want to block the user from setting up new matters, click the Security tab and then click on “Matter Details”. This will expand out all the functions you can block a user from performing in SILQ. To stop them from being able to set up a new matter, take the tick off the “Create” tick box. This will now restrict them from creating a new matter.
A more in depth explanation of each permission can be found here.
In the “Users” sub tab of the security tab, if “Edit” is ticked, it will mean that the user can change their own permissions. Make sure this is configured correctly for each user set up in the system.
Individual InfoTrack Login

Some firms have individual Infotrack logins for each of their Fee Earners, whilst other firms have the same login for everyone at the firm. If your firm is set up as the former, then clicking on the InfoTrack sub tab here in the new user window, will allow a different Username and Password to be entered specific to that individual user. If your firm only has one Infotrack Login that everyone uses, then this section can be left blank
Budgets

Clicking on the Budgets tab allows one to enter the total number of hours for the year they expect the fee earner to do. The years run from the 1st of July to the 30th of June. In the example above 1800 hours were entered. It will then multiply that with the fee earners hourly rate to give a yearly dollar budget.
Each of these two numbers will then be spread evenly over the 12 months.
If however you want to make September a smaller figure, September can be adjusted, but you will need to either adjust another month so that the totals still add up. The same happens for the dollar value.
Having entered a budget for someone, it will show in the Fee Earner report in the Budget column, and there will be a percentage figure in the Hours and Fees Columns to tell you what percentage of their budget they have done for that period.
Depending on what date grouping is used in the report, E.g. month, 3 months, annual etc it will correctly add up the budget for the period in order to compare it.
After clicking on Save, the new user will now appear in the Users list. If you need to edit any Users record, first click the user by clicking on their name, then click the Edit User button on the top left side of the screen.
You can also delete a user by clicking the Delete User button.