- Help Centre
- Using SILQ Outlook Add-In
- Microsoft 365 Accounts
-
Setting up SILQ
-
Getting Started with SILQ
-
Financial Management
-
Advanced Accounting and Reporting
-
Trust Accounting
- Trust Accounting
- Controlled Money Receipts
- Statutory Deposits and Receipts
- Entering and Transferring Unknown Deposits
- Trust Accounting Chart of Accounts
- Trust Reporting
- Deposit Adjustments and Withdrawals
- Trust Account Bank Reconciliations
- Trust Reconciliation Example Scenarios
- Trust Transaction Dating and Trust Money Recording
- Trust problem trouble shooting
- Protected Trust
- Automatic Bank Feeds
-
Legal Details
-
Document register, Document templates and Court Forms
-
Using InfoTrack in SILQ
-
Using SILQ Outlook Add-In
-
SILQ & Word Integration
-
Exporting Data
-
Invoicing
-
Using SILQ
-
Reports
-
Emails in SILQ
-
Estates
-
Time Entries
-
MYOB
-
Xero
-
Dashboards
-
Budgets
-
Permissions
-
Contacts
-
SILQ Security
-
Early Access
-
Moving to SILQ
-
What's New
-
SILQ Desktop
-
Subscription & Billing
-
Lexon Integration
Save an individual email within the Outlook Add-In
Saving an individual email with the Outlook Add-In is quick & easy.
To save a single item:
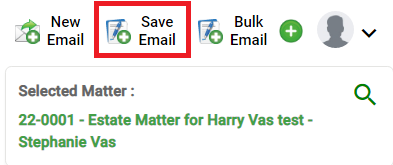
1. Click on the Save Email button
2. You will then see the below screen.
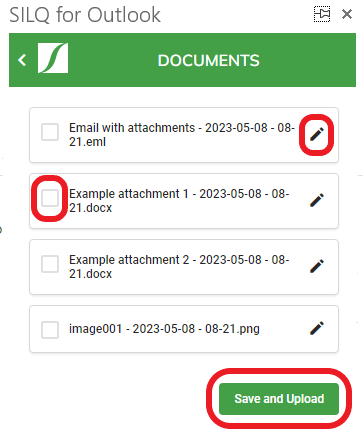
3. From here, you can edit the name of the email and each of the attachments by selecting the pencil icon.
4. As well as editing the name of the file, you can also select a sub folder to save the documents to for each email/attachment.
5. If/when you are happy with the names, select each item you want to save (you do not have to save them all and then click on Save and Upload.
6. The item will then appear in your document register and document storage folders for the selected matters.
7. Within Outlook Itself, the email you just saved will be categorised as having being saved in SILQ. Please note, if this is the first time you are doing this, you will need to add this categorisation to your master list. Instructions on how to do so can be found here.