Preview .EML Files Using Windows Explorer
EML files can be previewed just like .msg files can, however you just need to configure it to work. Below is how.
Many firms want to be able to easily preview the emails saved to a particular matter folder using their windows explorer, as opposed to seeing the preview within the document register within SILQ.
In order to acheive this, please follow the below steps. In addition further down in this article we will also show you how to configure your columns to also show the To, From etc fields.
Enable .EML Preview Using the Registry Editor
- Right-click Start, click Run.
- Type regedit.exe and click OK. This starts Registry Editor.
- Go to the following registry branch:
HKEY_CLASSES_ROOT\.eml
- With the .eml key selected, create a subkey named shellex
- Under shellex, create another subkey named {8895b1c6-b41f-4c1c-a562-0d564250836f}
- With the newly created subkey selected, double-click the (default) value on the right pane and set its data to:
{92dbad9f-5025-49b0-9078-2d78f935e341} - After completing the above steps, make sure that the registry settings looks like this.

That’s it! You’ve now added a preview handler for .EML files and will be able to preview the .EML file contents in Explorer.
View .EML file details using Windows Explorer
- Open This PC window and go to the folder in which the EML files are stored - we suggest putting an eml file as a test in your Documents root folder to make step 7 simpler.
- Click on the View tab and select Details

- Right-click on the heading of the file table and in the context menu click More...

- In the Chose Details window that opens, check the boxes next to From, From address, To, To address, Subject, and Date sent

- Optionally, uncheck/check other fields
- Click OK
- In order to apply this to change to all folders (which we strongly recommend), please do the below
- Right-click on your documents folder and select the Properties option.
- Switch to the Customize tab and choose a template from the drop-down list. (we suggest documents, but you may want to do it for pictures too.
- Check the Also apply this template to all subfolder boxes and click the OK button.
- The above setting should now be applied to all sub folders within your documents folder
- To hide the navigation bar on the left, click Navigation Pane -> Navigation Pane

- To preview, click Preview Pane

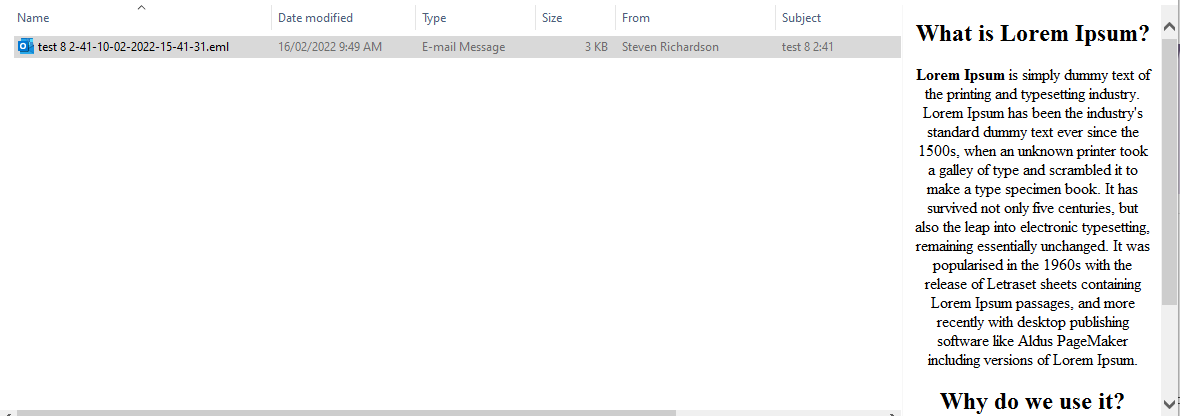
Now the directory with the EML files looks like this:


