- Help Centre
- Financial Management
- Entering a Receipt into SILQ
-
Setting up SILQ
-
Getting Started with SILQ
-
Financial Management
-
Advanced Accounting and Reporting
-
Trust Accounting
- Trust Accounting
- Controlled Money Receipts
- Statutory Deposits and Receipts
- Entering and Transferring Unknown Deposits
- Trust Accounting Chart of Accounts
- Trust Reporting
- Deposit Adjustments and Withdrawals
- Trust Account Bank Reconciliations
- Trust Reconciliation Example Scenarios
- Trust Transaction Dating and Trust Money Recording
- Trust problem trouble shooting
- Protected Trust
- Automatic Bank Feeds
-
Legal Details
-
Document register, Document templates and Court Forms
-
Using InfoTrack in SILQ
-
Using SILQ Outlook Add-In
-
SILQ & Word Integration
-
Exporting Data
-
Invoicing
-
Using SILQ
-
Reports
-
Emails in SILQ
-
Estates
-
Time Entries
-
MYOB
-
Xero
-
Dashboards
-
Budgets
-
Permissions
-
Contacts
-
SILQ Security
-
Early Access
-
Moving to SILQ
-
What's New
-
SILQ Desktop
-
Subscription & Billing
-
Lexon Integration
-
Firm Directory
-
Pricing Plans
-
Sales & Marketing Features
-
PEXA
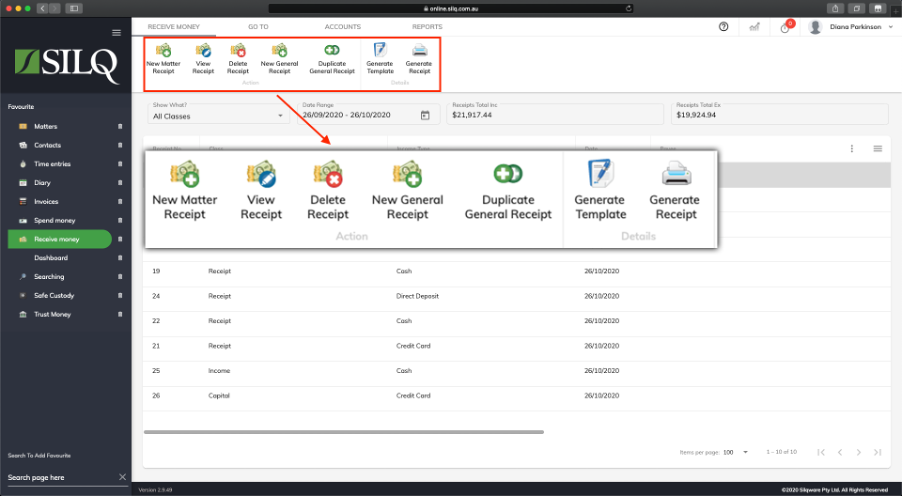
Receive Money Top Toolbar Buttons

The buttons located on the Top Toolbar give you all the functionality you will need to create, display, edit and generate receipts.
Below is a description of the functionality of each button:
- New Matter Receipt: Select this button to create a Receipt that is payment for one or more Invoices in a matter
- Edit Receipt / View Receipt: Depending on what is selected you will be able to either edit or view the receipt. If it is a general receipt then you will be able to edit it. If it is a matter receipt you can only view it. To change a matter receipt you will need to delete it and then re-enter it, although you can change a receipts allocations to different invoices, without having to delete it.
- Delete Receipt: Select this button to delete the selected Receipt.
- New General Receipt: Select this button to create a new General (non matter) Receipt.
- Generate Templates: This will allow you access the document generation system where you can create documents specific to the selected receipt or tagged receipts.
- Generate Receipt: This will generate the standard receipt template for the selected receipt.
