
In this article we outline the 3 types of documents you can generate within SILQ and at the end of the article we explain what all of the icons in the post document generation (Template Generated) window do.
The 3 types of documents you can generate with SILQ are:
- Invoices
- Receipts
- Custom Templates - these can be any type of templates / precedent you use regularly and are wanting to pull information from SILQ into the document. Examples are: Letters to Clients, Cost Agreements, Wills, Settlement Statements etc.
Already Created Invoices
For information on how to create an invoice please click here.
You can generate already created invoices from two different sections:
- Navigate to the Matter Invoices screen in the Time & Billing window and click on the Generate Invoice button
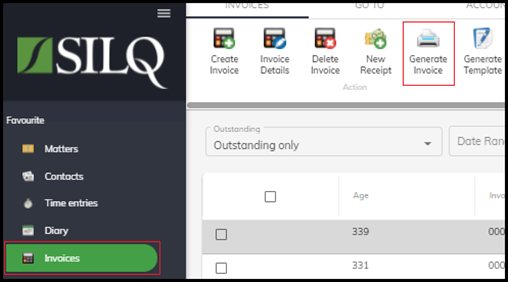
- Navigate to the Invoices window, (which can be accessed from the quick menu on the left) and click on the Generate Invoice button
[1] Time & Billing

[2] Invoices
To generate the default invoice, you will need to select Generate Invoice Only from the below screen:
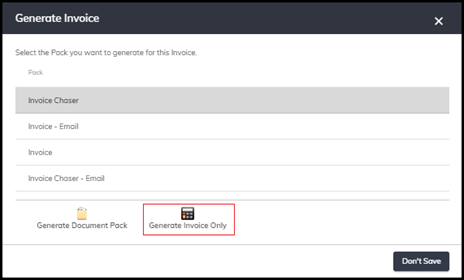
Note that the item selected from the list is irrelevant when generating the default invoice. The list only relates to document packs.
Already Created Receipts
For information on how to create a receipt please click here.
You can generate already created receipts from two different sections:
- Navigate to the Receipts & Credits screen in the Time & Billing window and click on the Generate Receipt button
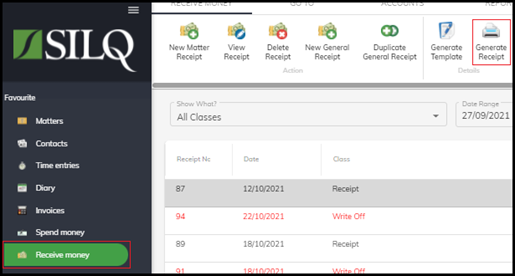
- Navigate to the Receive Money window, (which can be accessed from the quick menu on the left) and click on the Generate Receipt button
[1] Time & Billing

[2] Receive Money
Custom Templates
To generate custom templates you can do this from the Document Templates window.
Most custom templates can be accessed from the Matters window (with the exception of custom invoices & receipts that are not set as your default - explained in more detail below).
From within the Matters Window, highlight the matter you would like the template generated for and click on the Document Templates icon. This will take you to the Document Templates window.
From the below window, you can select a template to generate from the list provided. The list will include the SILQ standard templates as well as any templates you have uploaded.
Highlight the relevant template and click the Generate Document button.

Generating a custom invoice template
Similar to generating the default invoice, you highlight the invoice you would like to generate a document for but instead of clicking Generate Invoice, you click Generate Document, which is the button to the right. This will take you to the Document Templates screen with the highlighted invoice as the focus for the document. Then simply follow the steps above to generate the custom invoice template.

Generating a custom receipt template
Similar to generating the default receipt template, you highlight the receipt you would like to generate a document for, but instead of clicking Generate Receipt, you click Generate Document, which is the button to the right. This will take you to the Document Templates screen with the highlighted receipt as the focus for the document. Then simply follow the steps above to generate the custom receipt template.
Note: If you try to generate an invoice or receipt template while the matter is the focus, it will not populate data into the document. You will need to have navigated to this screen with a highlighted invoice/receipt for those templates to successfully generate. This is because a matter can have multiple invoices and receipts on it, so generating an invoice or receipt template with the matter as the focus, means SILQ cannot determine which invoice’s or receipt’s data to populate.
Post Document Generation Window (Template Generated)
After a document is generated, a document register item is created and if you have a cloud drive set up, it is also saved into the appropriate matter folder. You will then be presented with a screen that can have up to 7 options available, based on your settings.
 1. 1. View Document
This will attempt to open the document online. How it does this will depend on your cloud drive storage settings. If you have no cloud drive set, it will download the document and open it locally. If you have a cloud drive specified, it will open it via that website. Each cloud drive handles viewing online differently. For example, some will open it in Word Online, others will open a read-only or preview of the file.
2. Rename/Move DocumentThis option is only available if you are connected to a cloud drive and will allow you to rename the document. It also gives you the ability to move it to one of the sub-folders of the matter.
3. Download DocumentThis will download the document to your local machine. This creates a copy of the document and will store it in your downloads folder.
4. Open in Desktop WordThis option is only available if you are connected to a compatible cloud drive. This will open the document in Microsoft Word on your computer. It only works with SharePoint or OneDrive and does not work with DropBox. It will require Microsoft Word to be installed on the machine.
Note: This differs from Download Document in a critical way – This option will open the document while it is still linked back to your cloud drive. This means any changes made will be reflected on the document stored in the cloud drive. Whereas Download Document creates a copy of the document, and this copy is not linked to the cloud drive, meaning changes made will be saved to the downloaded file, not the file saved in your cloud drive.
5. Convert to PDFThis will create an additional copy of the document but in PDF format. It will store the PDF in the document register and in the cloud drive (if set up). The PDF will appear underneath the original document and have some similar options (all 7 will not be available).
6. Convert and email the documentThis will create a PDF document similar to step 5 above, but instead of displaying it as an additional file underneath the original, it will prompt you to select an email template and then load up that email template with the PDF pre-attached, ready to send.
7. Email the documentThis will prompt you to select an email template and then load up that email template with the original document pre-attached, ready to send.