
In SILQ, you have the flexibility to customize your invoice template to align with your brand identity.
To access the invoice template settings:
1. In the top right hand corner, click on the dropdown and click on system settings.
2. On the left hand side, under Templates, click on Invoice Templates

3. Click on Edit to edit the default template (If you would like to create a new template, click on new)
4. You will be presented with the following window:

5. Please enter a Template Name - If you are editing the default, you can rename it. Whenever entering a new template name, always make sure that this is a different name to any other you have in invoice templates, otherwise it will override any settings you had for that template automatically.
6. Font settings - choose any font, font size or font colour you would like
7. Header Settings - There are 2 header options. The first is Default which is simply your business details at the top of the page. The second option is User Image. If you choose the User Image option, the below window will come up:

8. Select your file.
9. Once uploaded, you will see that the buttons down the bottom are greyed out. This is because you are able to drag the logo and position it anywhere you like. The dotted lines represent the page. For example, in the image below, the logo is sitting on the left hand side, therefore it will be in the same position on the invoice. If you move it to the middle of the screen then it will be in the middle on the invoice etc.
If you preview the invoice and the logo is too big or too small, you can use the zoom buttons to increase or decrease the size.

9. Footer Settings - You can choose for your footer to be any height you would like.
There are 3 options for footer settings:
a. Company Name - This will simply put in your Company Name and your ABN (if you have chosen for this to be in your footer) ontop of the liability statement. These details will come from the Name & Business sections in System Settings.  b. Email, phone, address, web - This option does not include your company name as the assumption is that is in your header, however does provide all of your contact information. The ABN is pre-pended to the liability statement. See below.

c. User Image - This is for when you have your own footer as an already created jpg or png file. This will bring up the same window as in step 7 above. Select your file and play around with the X & Y as well as width and height sizes. Use the preview button which will open another window and generate a preview invoice (using dummy data, not your live data) to see what it looks like and work out where you may need to make changes to the size.
10. General Layout - There are 13 options in this section, some of which can be seen in the screenshot:
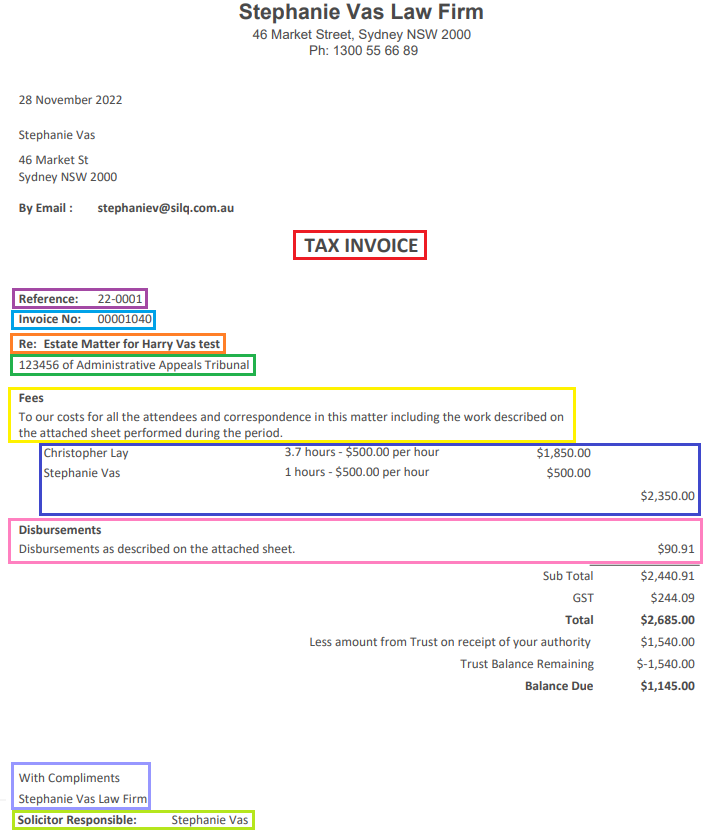
a. Text Invoice Title - See in the below image - this will go in the section that says Tax Invoice
b. ABN Location: There are 2 options here. You can either have it in the footer (see footer settings above) or you have have the ABN bolded under the words Tax Invoice below (please note, the word tax invoice can be changed to whatever you like, see option a above)
c. Reline Justification: See the image below. The reline states Re: Estate Matter for Harry Vas test. This line can either be Left, centre or right justified
d. Date Format: In this section you can choose which type of date format you like
e. Show Court Details: In order for these details to show you will need to ensure you have filled out the court detail field in the new/edit matter window of the matter you are generating that invoice for. The field can be found under the case/litigation details section
f. Show Matter Reference: See image below. This is the Matter Number
g. Indent Addressee Details: This optioned is designed for windowed envelopes. Normally the address details are left aligned but if it is on, it will shift it by about an inch
h. Show addressee Position: This refers to the position of the contact you are addressing the invoice to. For example, Director, Manager etc. This will only show if the position field in the contact card has been updated.
i. Show addressee Email: This refers to the email of the contact you are addressing the invoice to. This will only show if the email field in the contact card has been updated
j. Matter No Location: You can choose whether you prefer the matter number to show above the invoice number or above the date
k. Matter No Format: Choose to display the matter number on its own or to prefix it with either the matter owner's or primary fee earner's ID
l. Invoice No Position: In the below example the invoice number is left justified. You can also choose to have it right justified
m. Pad Invoice No with leading zeros: See below image. You can either have the Invoice # say 1027 or 00001027
11. Summary Information -
a. Show first page Summary: What you see in the screenshot above is the first page summary. If you turn this option off you will still see your header and footer, however it will essentially go directly to a detailed invoice - i.e. line item by line item with the total owing at the end of all of the entries
b. Append date range to fees description: For example, if you are billing for June it will give you the first and last time entry dates within June. This will not necessarily be 1st - 30th. It could be 3/06/2024 to 28/06/2024
c. Fees description: In the screenshot above, this is the text that says: To our costs for all the attendees and... etc. This is an open text field so you can write whatever you would like to see in there. This will only show if you have the above option a (show first page summary) as on
c. Disbursements Description: This can be found in the above screenshot in pink. It is an open text field so you are able to enter whatever text you would like and it will come up in that section
d. Show Solicitor Summary: Found in the above screenshot in dark blue. This section gives you a summary of the work done by each solicitor. i.e. SILQ will tally the work each Solicitor has done and put it in the summary here. Please note, it will only show the Solicitors that have time entries on this invoice; not all Solicitors attached to the matter. You can choose to have this at the start of the invoice, or at the end
e. Solicitor Summary Style: You can either have the summary look like the above screenshot (condensed) or the below (expanded)
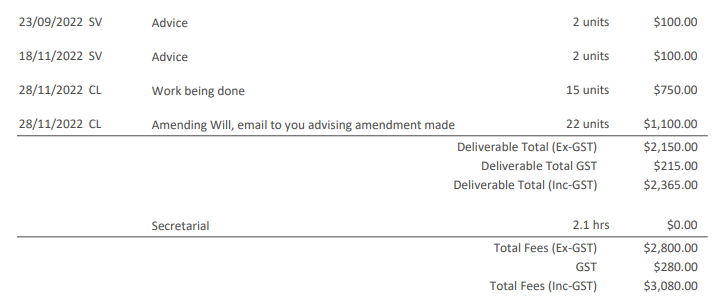
f. Show Deliverable Summary: If you have deliverables on this matter, you can choose to show the deliverable summary. It will look like the below screenshot if you choose to have it on the front page and will be similar if you choose to have it at the end.

12. Financial Details -
a. Show Written off Amount: This is relevant when you have already sent the invoice to the client, but for one reason or another you have decided to write off part of that invoice. When you re-generate the invoice, the client will be able to see the amount that has been written off. It will look like this: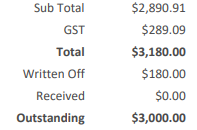 b. Show Received Amount: This shows you any moneys that have been credited to this invoice
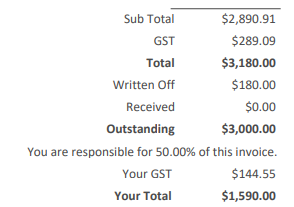
c. Show Billing Recipient: This is used if you are sending split invoices. Once you have set the billing recipients up correctly, then the invoice will look like this:
d. Show Trust Balances: You are able to clearly show on each invoice how much the client has in trust and what is either still outstanding or still left in trust after the invoice has been paid. The invoice will look like this:

e. Show Foreign Currency: If you have Foreign Currency set up then you will be able to show the conversion rate you have input into your settings.
f. Group Secretarial Works: If your firm prefers to group secretarial work as opposed to show each line item for the secretaries, you are able to turn this option on and in the invoice details section, the invoice will look like the below image. Please note, by grouping the secretarial work, there will not be a date shown.
g. Add E&OE line: This is an abbreviation for "errors and omissions excepted". If you turn this on it will be shown under the fees section.
h. Summary Label Position: See image in point d. This is the option where words are right justified (near the numbers). If you choose Left, it will leave the numbers where they are but the text will be left justified
i. Outstanding Table: SILQ is able to provide a table that outlines any outstanding invoices broken down either by the same matter the invoice you are generating is for, or for the same client regardless of which matter. Below is an example. As the invoice you have just generated is not yet outstanding, it will not be included in this table unless the invoice is regenerated after the due date

j. Show Written Off Amount & Show Interest Amount: These two options refer to the outstanding table. In the above image, they are set as on. If you turn them off, the written off and interest columns are then not shown
13. Signature Details -
a. Person Responsible: An example can be found in the image below. You can choose for this person to either be the Matter Owner or the Primary Fee Earner (both of which are set when creating or editing a matter). Otherwise, you can choose None and this will remove that line completely

In addition, you can have SILQ insert a digital signature below the Solicitor Responsible name. In order to do this, you can go to the Users section under system settings. Choose the relevant user and click on edit. Scroll down to Biography, Photo and Signature and expand. You will then see a section where you can upload your signature

b. Person Responsible Title: You can choose to either have this section look like the above or you can have just the name (without the words solicitor responsible) and the title of the solicitor underneath (e.g. Partner). In order for the second option to work, you will need to ensure that the position field is completed in user settings for that Fee Earner
c. Hide Practice Name: In the image above, had this been turned off, the firm name would not show under with compliments
d. Statement after Signature: You can put anything you like in here if it relevant to you. Some examples are terms and xmas hours
14. Statements - The statements themselves can be found and set in system settings. Please see an explanation here.
a. Show Statement: This is simply where you would like to show the statements. You have the option to show them:
i. At End With New Page - i.e. on its very own page at the end of the invoice
ii. On First Page - this will go underneath the summary
iii. At End - this is at the end of the invoice, but not necessarily on its own page - simply right after the very last line of the invoice details
b. Show With Compliments: On the summary page, you can end your summary with the wording 'With Compliments' which looks like this: c. Show Statement 2: See screenshot below. The reason these are separated is so that you can choose which to show on different templates.
d. Show Statement 3: See screenshot below.
e. Show Statement 4: See screenshot below.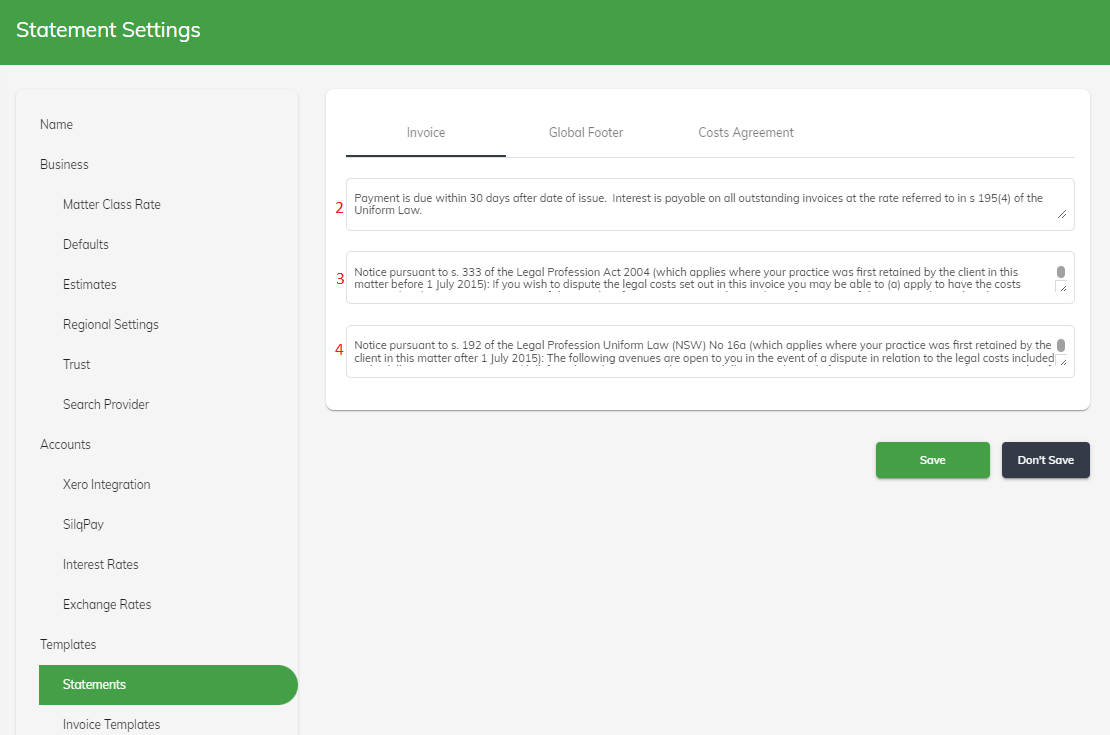
15. Remittance -
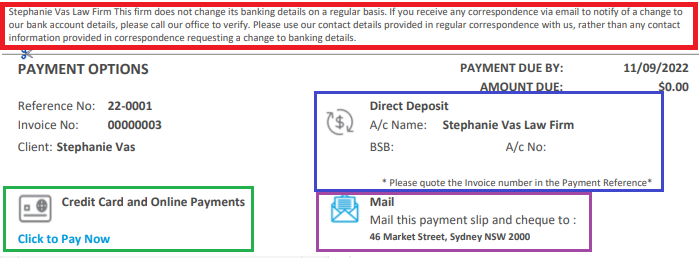
a. Show remittance: An example of the remittance can be found in the below screenshot. It is important to note that the remittance is a fixed design. The information is customisable and things can be added or removed, however the placements are fixed
b. Direct Debit Account: This allows you to choose whether you want to display the firm's trust account number or the practice account. Both of these are setup under Business Details in system settings
c. Show Bank Details Don't Change Statement: This is the statement circled in red below. The wording can be changed in point g below
d. Show Credit Card Option: The credit card option is linked to our SILQ Pay
e. Show Direct Debit Option: This is your bank account. Depending on which option you have chosen in point b above, it will show those bank details here
f. Show Mail Option: If you would like to give clients the option to mail a cheque, the address will be populated from the organisational details section in system settings. If you do not want this option, it can be turned off
g. Bank Details Don't Change Statement: See below an example. Although we have called it bank details don't change, you can actually put in any text you like
15. Work Items
a. Show taxes as: This is in reference to individual work items. For example if you have a time entry that is $100 and you have chosen inclusive, then the summary down the bottom will be $100 and advise the GST amount. But if you choose exclusive, then the time entry will still show $100 but the summary total will be $110
b. Display quantity type as: This is relevant if for example you bill in 6 minute units but would prefer to display your time entries in the form of hours on your invoice to clients. In this case SILQ will convert however many units you billed into the equivalent amount in hours. Similarly, if you have some fee earners who bill in units and others who bill in minutes or hours. In this example, if the firm chooses to show only hours on the invoices, the units and minutes will be converted to hours.
You have the option to display your quantity type as either:
i. hours
ii. units
iii. hh:mm
iv: minutes
v: As entered - this option will not re-calculate anything, it will simply display as you have entered into SILQ.
c. Show work item quantity: Related to point b above, in the time entries line items on the last page, you can either add a column to show the quantity type or append the quantity type to the end of the text. For example if you use 6 minute units and you have a time entry for 12 minutes then it will display 2 units. This will be the column before the $ amount specific to that entry if you choose 'Own Column' as the setting. If you choose 'Append To End of Text' then it will add the number 2 at the very end of the time entry description text. E.g. Reviewed contract - 2
d. Show Disbursement Payee: In the disbursements line items on the last page, you can either add a column to show the payee or append the payee name to the end of the text.
e. Hide Time Entries: This will not show any line items for the time entries. The client will not have a breakdown, but rather on the summary on the first page.
f. Use Deliverables: Deliverables are an option only found in our top tier product called Expert. If you have subscribed to this and are using deliverables you can choose to show the line item time entries grouped by deliverables. For example if you have 2 deliverables set with 5 time entries under each deliverable, it would look like the below:
g. Show Individual Costs: This will be on by default. If on, each line item will have the associated cost next to it. If off, it will show each time entry on a separate line, but there will be no individual time entry costs, it will only have a total at the bottom
h. Show Fee Earner: In the time entries line items on the last page, you can either add a column to show the Fee Earner (normally the initials) or append the Fee Earner initials to the end of the text. E.g. Reviewed contract - AR
i. Show Dates Once: On the details page where you show the line item for each time entry - if you have this option on, rather than repeating the same date it will show each date just once with each subsequent time entry for that date underneath it
j. Insert page break before disbursements: This will place disbursements on its own page being the very next page after the break down of work items