
SILQ supports a full end-to-end process for managing partner distributions — from initial setup of equity accounts to reconciling personal expenses and transparently reporting on performance-based entitlements.
This article outlines how to use equity accounts, bank feeds, and the Partner Distribution Report to streamline your internal process and ensure each partner’s contributions and withdrawals are accurately recorded and clearly reported.
Some of the below features are only found in our Expert & Enterprise billing plans for Solicitors. Refer to the articles for each feature linked below.
Why use this process?
Using this end-to-end method in SILQ gives you:
- Transparent, auditable records for each partner, allowing them to access their own reports without relying on Accounts — reducing interruptions and saving valuable admin time.
- A streamlined, automated workflow that eliminates the need for manual transaction entry, saving countless hours.
- Real-time visibility into each partner’s expenses, reimbursements, and entitlements, supporting informed budgeting and decision-making.
- Simplified equity tracking — no more external spreadsheets or manual journals. Everything is recorded and managed directly within SILQ.
The below steps will walk you through everything that needs to be done in SILQ to get you an accurate distribution figure for each distribution period. Each step is required to ensure that the report is accurate, covering all matters the Partner is eligible to receive distributions for and to accurately report on costs associated with those matters.
Step 1: Ensure Partners are specified as Matter Owners
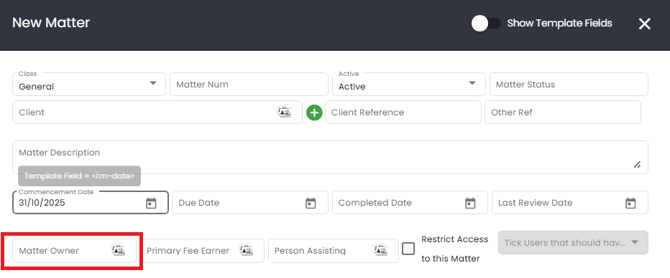
The Partner Distribution Report is generated at the partner level and includes all matters where the selected partner is assigned as the Matter Owner.
To ensure accurate reporting, make sure to assign the appropriate partner as the Matter Owner when setting up each matter. You can do this by selecting them in the following section:
If you do not believe this has been happening on historic matters, before continuing it is suggested that you go through each matter within a relevant period and update the Matter Owner.
Step 2: Enter Staff Costings for all employees & partners
SILQ’s Staff Costing feature enables you to calculate a precise internal hourly cost for each staff member by factoring in not just salary, but also overheads such as superannuation, rent, equipment, and other employment-related expenses.
This calculated hourly cost is then pulled into the Partner Distribution Report, allowing you to see the true margin or net practice contribution for every time entry recorded — not just what was billed.
Example:
Let’s say on Matter A, two team members have recorded billable work:
-
Partner X
-
3 billable hours
-
Total fee billed: $1,500
-
Staff cost: $750
-
-
Admin Y
-
4 billable hours
-
Total fee billed: $500
-
Staff cost: $250
-
On the report you will have the below totals for this matter:
-
Total Billed: $2,000
-
Total Staff Cost: $1,000
-
Margin / Net Contribution: $1,000
You will get the same totals for each matter that the Partner has been specified as the Matter Owner.
This step is important to ensure that the margins are accurate. To setup staff costings for each employee, please refer to this article.
The salary of a Partner is taken into consideration in the staff costing, therefore the margin figure is reflective of the base salary paid. For that reason, the Distribution figure owing (explained further down) will be treated as completely separate to the base salary. It should be explained to Partners that this report is the calculation for the distributions paid ontop of their salary.
Step 3: Setup the partner distribution calculations for each Partner
If your firm calculates partner distributions based on individual performance, SILQ can automate this process using the Partner Distributions tab within a user’s settings.
Example
Let’s say Partner X is entitled to a tiered percentage of the Margin (also referred to as Net Practice Contribution) earned within a financial year. Their agreement may look like this:
| Margin Range | Distribution Percentage |
|---|---|
| $0 – $233,333 | 0% |
| $233,334 – $500,000 | 30% |
| $500,001 – $1,000,000 | 50% |
| $1,000,001 – $2,000,000 | 70% |
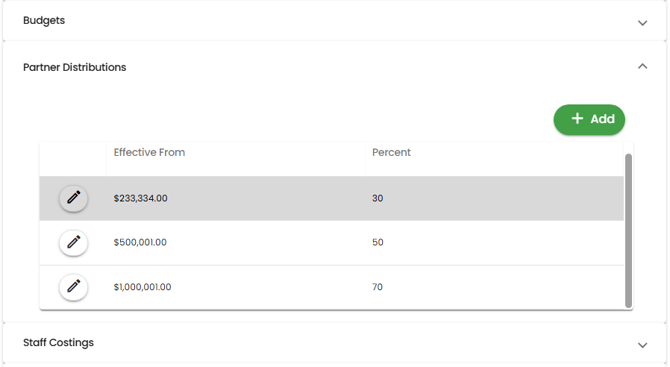
Setting This Up in SILQ
To configure this in SILQ:
-
Navigate to the Partner Distributions tab in the user’s settings.
-
Enter the “Effective From” amount for each tier (the point at which the partner becomes eligible for a share of the margin).
-
Enter the percentage they’re entitled to for that tier.
Note: SILQ will automatically close each tier $1 before the next tier begins. For example, if the next tier starts at $500,001, the previous tier will end at $500,000.
How SILQ Calculates the Distribution
If Partner X’s margin for the previous financial year was $1,424,257, SILQ will calculate their distribution as follows:
$266,666 @ 30% = $79,999.80
$500,000 @ 50% = $250,000
$424,256 @ 70% = $296,979.20
Total Partner Distribution = $626,979
To activate this functionality, make sure all tiers and percentages are correctly entered into the Partner Distributions tab for each Partner before moving onto the next step.
Step 4: Set up equity accounts for each partner
In many firms, it's common for partners to charge personal (non-firm-related) expenses to the company credit card or another firm account. These amounts must later be reimbursed by the partner — a process that can often be time-consuming and manual.
To streamline this, SILQ automatically calculates what is owed back to the firm by each partner and reflects this as a line item in the Partner Distribution Report. This appears under the Partner Distributions Earned field with the label “Partner Drawdown”.
This figure is deducted from the partner’s distribution, providing a clear “Partner Distributions Owed” amount.
To achieve this, each eligible partner should have their own unique equity account created within your firms Chart of accounts in SILQ. These accounts serve as individual running ledgers to track:
-
Contributions or reimbursements to the firm (e.g. repayment of personal expenses)
-
Partner distributions based on firm KPIs or individual billing performance
-
Any balances owing to or from the firm
If your firm pays distributions in advance, these can also be entered directly into the partner’s equity account as a debit, allowing for accurate reconciliation against future entitlements.
How to set this up
Navigate to the Chart of Accounts and follow the below Steps:
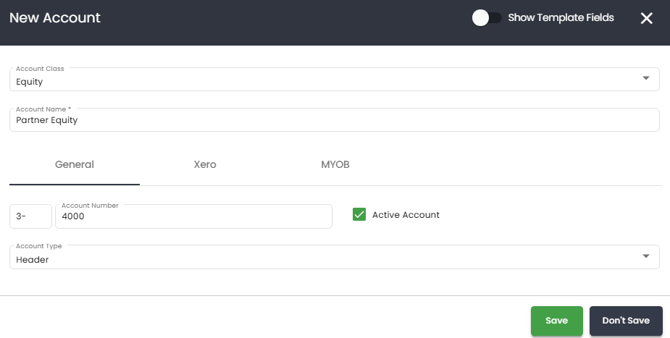
- Click on New Account
- First, create a header to neatly group the individual equity accounts and avoid any confusion from the company equity accounts.
- Choose the Account Class as Equity
- Call the header Partner Equity or whatever name suits you
- In the account number field, type in 4000 if that is not in use, otherwise choose another one
- From the account type dropdown choose header
- Press save
Then, you will need to add an account for each partner. This time:
- Click on New Account.
- Identify the first partner you want to add and:
- Choose the Account Class as Equity
- In the Account Name field, type in the full name of the partner
- In the account number field, type in 4001 (if 4000 is what you used above, otherwise whatever you used, plus 1)
- From the account type dropdown choose detail
- Press save
- Repeat this for every partner.
Tip: Clearly name each equity account for easy identification (e.g. “Equity – John Smith”).
Once these accounts have been added, you will need to go into the user account for each partner and link it to their equity account.
Step 5: Connect bank feeds, including partner credit cards
All firm bank accounts — including partner credit cards — can be connected via SILQ’s CDR-compliant bank feeds. This ensures all transactions are imported in real time for seamless reconciliation.
Follow the steps in the above article to set up the relevant cards/accounts.
Step 6: Start reconciling personal expenses using bank feeds
Now that the feeds are connected, follow the below process to reconcile personal expenses to a partners equity ledger:
- Navigate to the Accounts tab and click on the Bank Feeds icon.
- Choose the card you would like to reconcile.
- Filter for withdrawal.
- Identify those transactions that are personal expenses for a particular equity partner.
- Class - From the dropdown choose the Personal option.
-
Choose the payee:
-
If the payee is already entered as a contact you can:
-
start typing in the field and the contact should appear as you narrow down. Simply click on the correct contact.
-
click on the contact icon on the right hand side of the field and choose that contact from the list
-
-
If the payee is not already entered, you can click on the contact icon on the right hand side of the field and click on New Contact to add them in. Once added, select them from the list
-
-
In the expense account section, use the button on the right hand side of the field to choose the relevant equity account for the partner that made that charge.
-
The note field should be pre-populated based on the description that comes through from your bank transaction. You are able to edit and amend this if you want to add further clarification for the partner.
-
Choose the GST type. Some expenses such as interest do not include GST, and other expenses such as an Infotrack searches may incur an amount less than 10% GST.
-
Click OK. That transaction is now successfully reconciled to the equity account of the relevant partner.
Any transactions that are reconciled in this way be treated as a reimbursement owed to the firm, debiting the equity account. The transactions will appear on the Partner Distribution report and will contribute to the partner drawdowns calculation mentioned above, reducing the partners net entitlement.
This approach allows transparency over what’s been spent personally vs. business-related, while maintaining a single, automated reconciliation workflow.
The below two steps have yet to be 100% confirmed. As such, the instructions are subject to change over the coming weeks as development continues.
Step 7: Use the Partner Distribution Report
The Partner Distribution Report in SILQ provides a clear view of:
-
A breakdown of billing performance vs. expenses incurred
-
All transactions recorded in each partner’s equity account
-
Net distribution amounts available for drawdown or payment
You can run the report for any chosen period, providing full transparency to partners on how their figures were calculated and what their current position is.
Follow the steps in the above article to generate the report and understand how it works.
Step 8: Calculate and record distributions
Once partner distributions have been calculated from the report, the Accounts team can record the distribution as a journal entry into each partner’s equity account as a credit.
This ensures that every transaction — whether reimbursement or distribution — appears in the correct account and is reportable.
When the distribution is payed to the partner, it should also be recorded in the equity account as a debit.
Note: You can choose to leave surplus funds in the equity account, allowing partners to draw down over time (e.g. via the credit card), or pay them out via EFT or another mechanism.
The partner distribution report can be re-printed to then reflect any changes to the equity account with the totals re-calculating for you.
The partner will have a detailed list of transactions within the equity account for that specified period to allow them to make sense of the partner drawdowns calculation.
Note: The report cannot take into consideration anything that happens outside of SILQ e.g. franking credits - unless you are able to record this in the Partners equity account - however whether that is achievable or not is a question for your accountant.